July 27, 2024
How To Draw A Raptor
How To Draw A Raptor. There’s no denying that dinosaurs are cool. That said, while we don’t know much about what they would have looked like, we do know enough to be sure they probably wouldn’t have been fun to live with. Movies like the Jurassic Park series try to imagine what it might have looked like, but it will always be a guess. Judging by how terrifying raptors are in movies, that’s probably a good thing. 
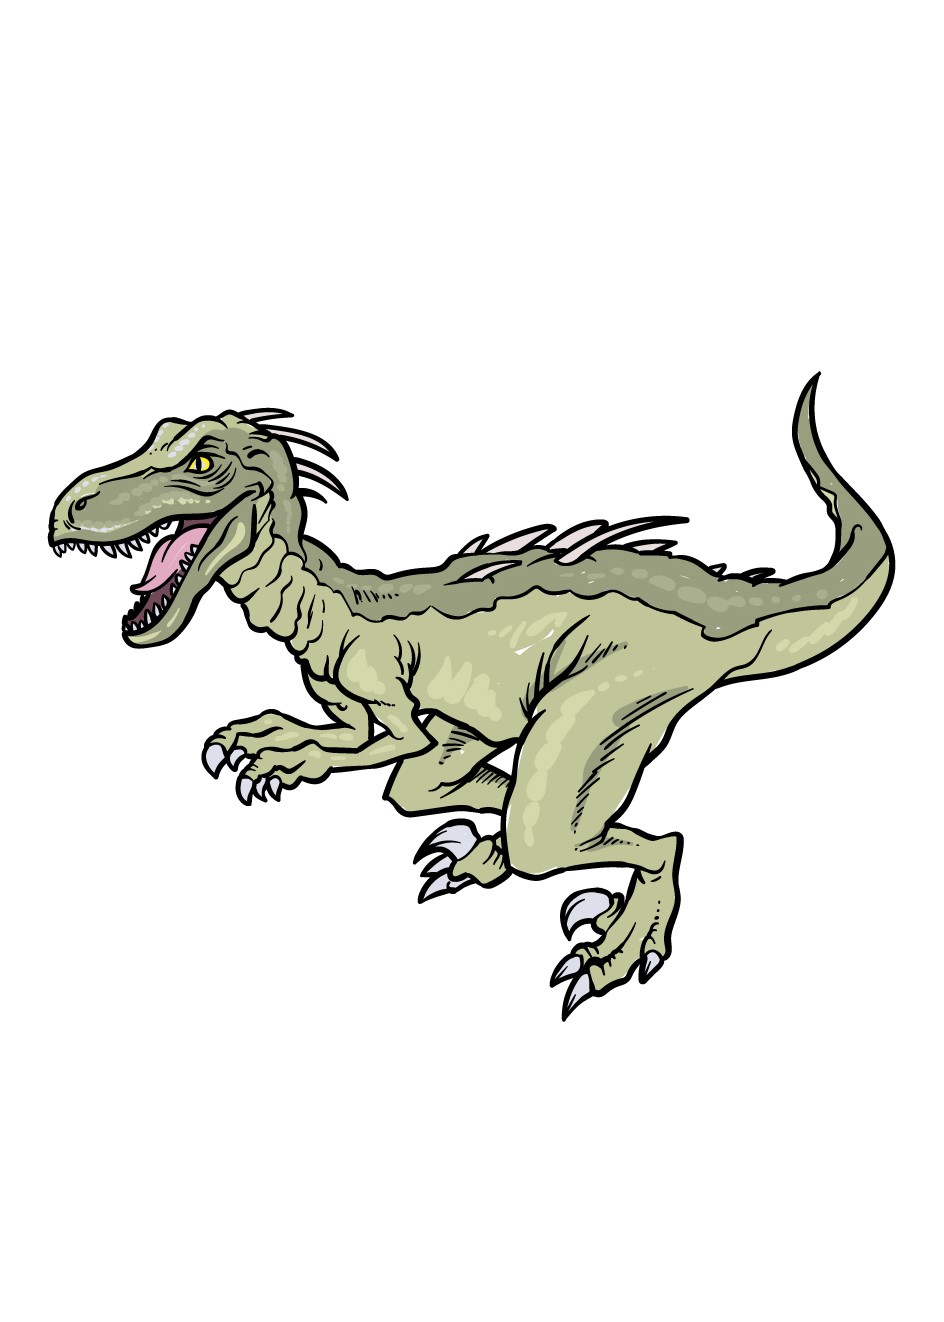
Still, these dinosaurs are very popular with dinosaur enthusiasts, and learning how to draw a raptor can be a lot of fun to try! This step-by-step guide on how to draw a bird of prey in 6 easy and fun steps will show you how you can recreate this scary dinosaur! You can draw many more characters like bird drawing with color, Anubis drawing, cat drawing, cobra drawing, blueberry drawing, coconut drawing and many more drawing for kids.

Step 1:

There is some debate in the archaeological community about what the dinosaurs probably looked like, but in this guide, we will stick to the classic interpretation of how to draw a bird of prey. To begin this guide, we will first draw the head of this fearsome dinosaur. There’s a lot of detail included in this image, so while you’re working on it, you should do your best to replicate the lines exactly as they appear in our example. For the head, we will use a lot of curved lines for the outline. You can then draw a small rounded shape for the eye and then draw a downward line to achieve that reptilian look. The open mouth will also be drawn using curved lines and of course, we will also add lots of sharp teeth inside. Add the pointed tongue inside the mouth, then you can add curved line details to the face for more definition. Finish by drawing pointed spikes on the back of the head, then we can move on to step 2!

Step 2:

This two-step of your raptor picture will show you how to remove the relic’s neck and small components. First, we’ll use lots of curved lines connecting the raptor’s wrinkled neck. You can also use an irregular curved line for the upper neck and the beginning of the chest. Yet, for this stage, we will pull the arms of the raptor. These choices have a round base, and the rest intention is angular and thin.  They will end in sharp claws and then you will be ready for step 3 of the walkthrough.

Step 3:

For this third step of our guide on how to draw a raptor, we are going to add more to the dinosaur’s back, tail, and legs. First, continue the curved, jagged line you used for the neck to the tail. As you can see in the reference image, the tail will curve to point up. You can also draw other spikes on the back, and they will look quite similar to the ones that were on the neck. Finally, we’ll draw the top of the leg using more curved lines. Add some line details along the parts you’ve drawn so far, and then we can move on to step 4.

Step 4:

You started with the legs in the previous part of your raptor drawing, and we’ll add a few more in this fourth part. Rather, we will concentrate on the leg nearest to us as viewers. For this leg, we’ll use more curved lines to draw the long thighs that descend from the body. This will then curve quite abruptly towards the thinnest bent part of the leg. There will be a gap at the end of this step which we will fill in soon, but for now, you can finish drawing the foot of the other leg that is in place. Then we can complete the final pieces in the following stage of the direction.

Step 5:

It’s almost time to add some color to your picture, but we have some final details and things to add in this step of our guide on how to draw a bird of prey. First, we will complete the step you started in the previous step. Simply finish by drawing another foot with sharp claws on the end of this leg. Fill in a few final details, then you’re ready to color! Before continuing, you can add to the image by creating a background or even adding a few more dinosaurs. What type of scenario do you envision for this scary raptor?

Step 6:

To conclude this raptor drawing, we will now finish with a little color! In our reference image, we’ve gone for a typical reptilian look for this dinosaur by using different shades of green for the raptor’s skin. When coloring your dinosaur you can use the same color scheme Finished Drawing!

Leave a Reply

Your email address will not be published. Required fields are marked *